https://ocw.cs.pub.ro/courses/egc/teme/regulament
Table of Contents
Tema 2
Joc de biliard
Scopul temei este de a crea un joc clasic de “8 Ball Pool” cu 2 jucatori, care foloseste 7 bile rosii, 7 bile galbene, o bila neagra si o bila alba. Exemplu:https://www.youtube.com/watch?v=6uzf1nXZW6E
2D
Stadii
1. Spargerea bilelor
La inceputul jocului, bilele sunt aranjate ca in poza urmatoare:
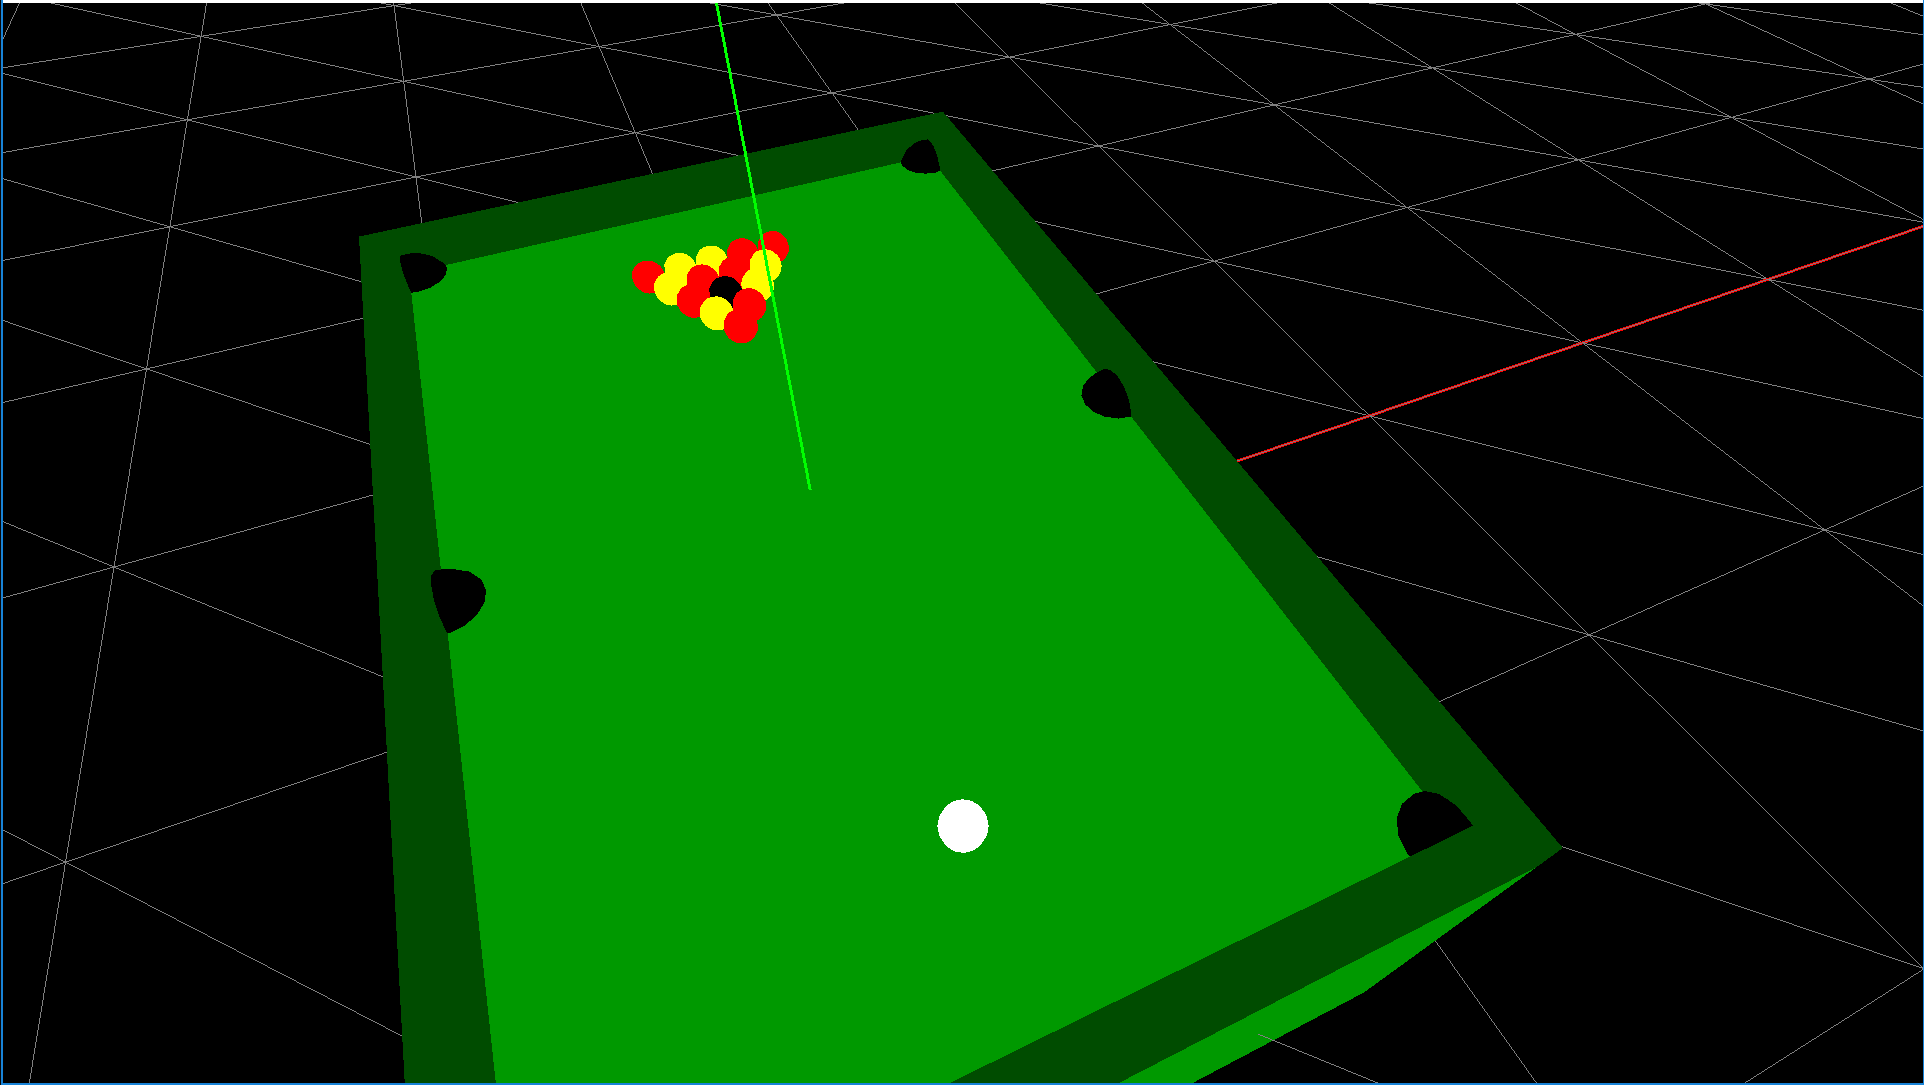
Vor fi aranjate intr-un triunghi format din cele 15 bile in a treia treime a mesei, iar bila alba este situata in prima treime a mesei.
    R
   R G
  G N R
 G R R G
R R G G R
R - bila rosie G - bila galbena N - bila neagra
Jucatorul care incepe va putea deplasa bila alba in prima treime a mesei. Dupa ce a mutat bila unde doreste cu tastele “WASD”, apasa pe “SPACE”.
Jucatorul va fi constrans in a muta bila alba doar in prima treime a mesei
View-ul pe care il va avea dupa apasarea tastei “SPACE” este urmatorul:
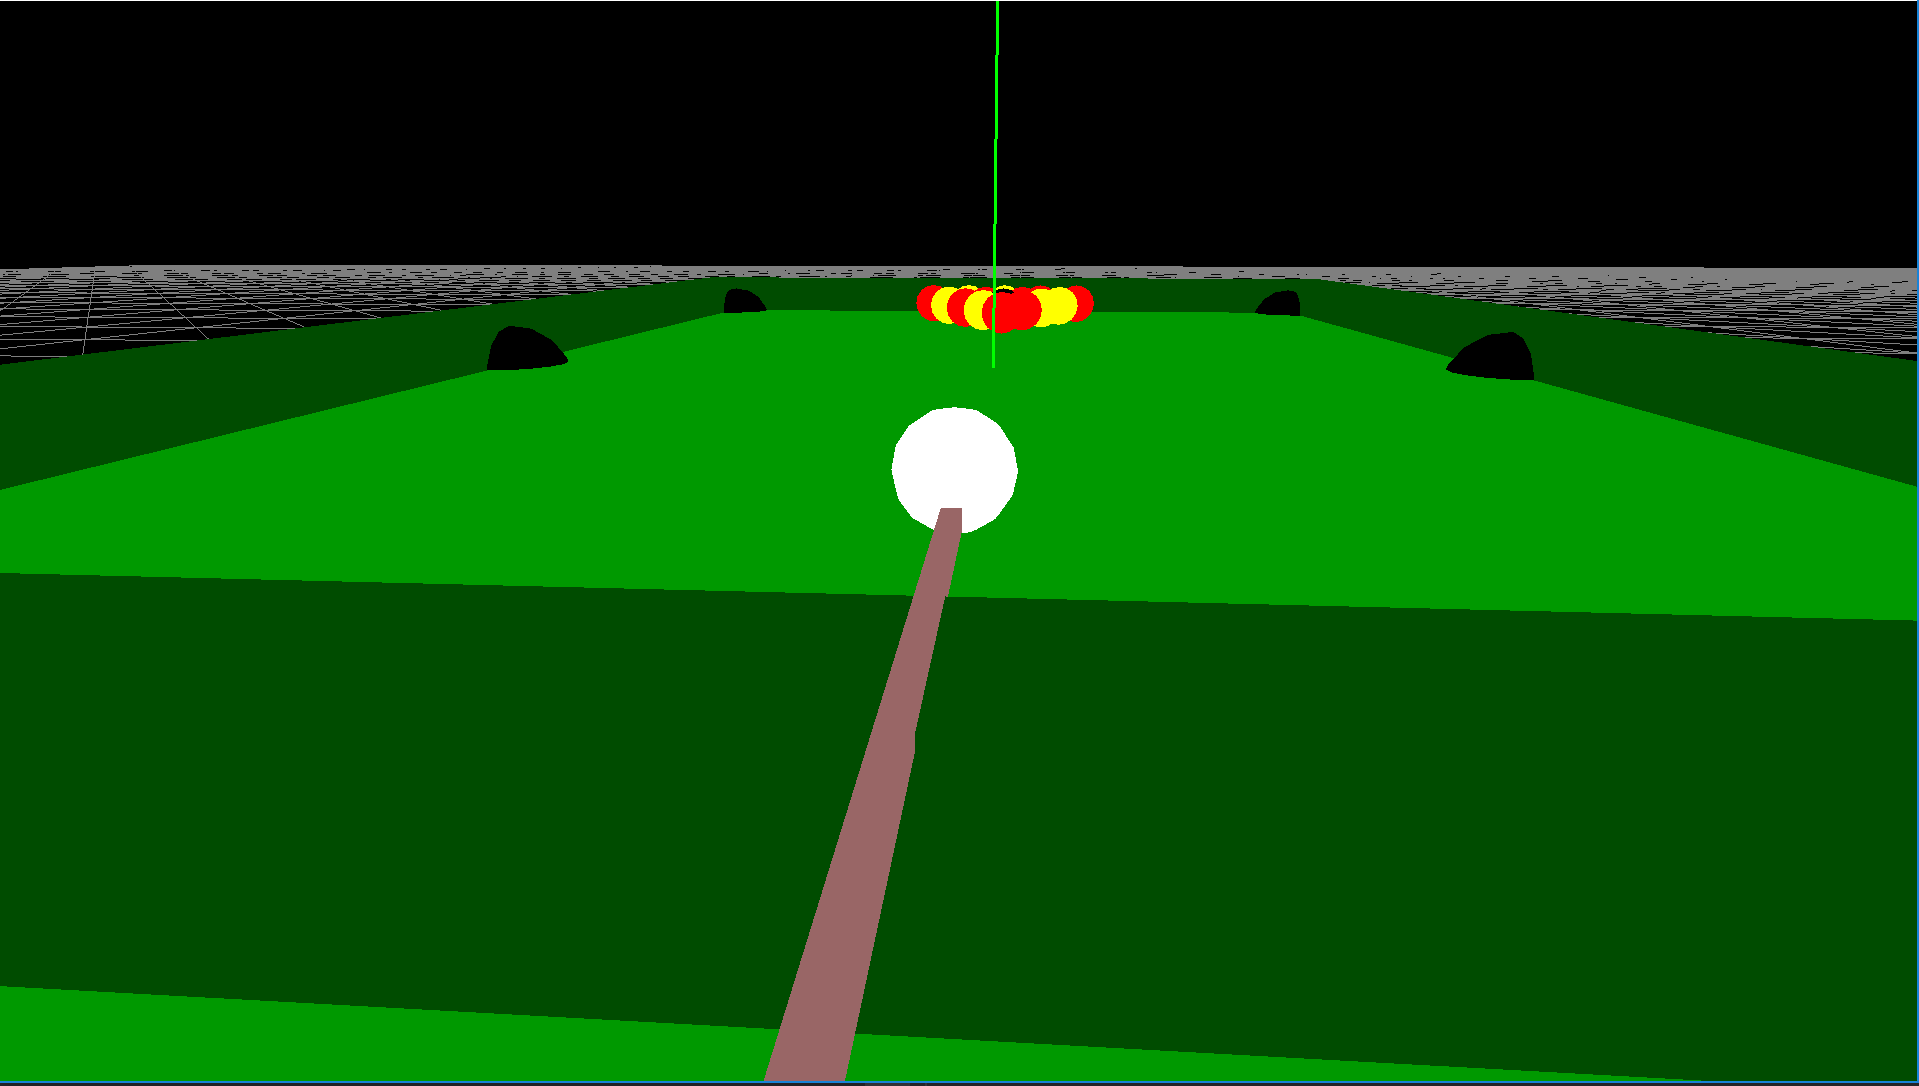
La inceput, tacul este foarte aproape de bila alba. Tacul va avea o animatie de retragere (pe directia tacului) atunci cand se apasa “Left Mouse Button”. Aceasta animatie va fi facuta in vertex shader. Dupa ce tacul a ajuns la o distanta anume de bila alba, acesta revine aproape de bila alba si animatia se reia. Intensitatea loviturii va fi direct proportionala cu distanta intre tac si bila alba. Cand dam drumul butonului din stanga al mouse-ului, se executa lovitura. De asemenea, cu “Right Mouse Button” se poate misca tacul in jurul bilei albe, camera urmarind bila alba si tacul ca in modul third person. Directia loviturii este data de directia tacului. Dupa lovitura, bila alba va avea o anumita viteza cu directia tacului si magnitudinea proportionala cu distanta dintre tac la bila alba in momentul release-ului butonului stang al mouse-ului. In momentul ciocnirii bilei albe cu celelalte bile, acestea vor trebui sa se comporte ca in viata reala. Deplasarea bilei albe este in planul XOZ.
2. Alegerea culorii fiecarui jucator
Culoarea cu care joaca un player este aleasa in momentul in care jucatorul introduce in buzunar prima bila de culoare galbena sau rosie. Dupa aceea, jucatorul respectiv trebuie sa introduca toate bilele de culoarea respectiva in buzunar, iar celalalt jucator trebuie sa introduca bilele de cealalta culoare.
3. Jocul pana la bila neagra
Jucatorii trebuie sa-si introduca in buzunar toate bilele. O bila este introdusa in buzunar in momentul cand se apropie atat de mult de un buzunar incat putem trage aceasta concluzie. Dupa aceea, ei pot introduce bila neagra. Cine introduce primul bila neagra este castigator. Daca este comis un fault, celalalt jucator poate plasa bila alba oriunde pe masa cu tastele WASD (atata timp cat nu intersecteaza alte bile). Fault-ul este de doua feluri: daca un jucator, la o lovitura, nu isi atinge prima data propriile bile sau daca bila alba intra in buzunar. Dupa ce a plasat bila alba pe masa cu un view top-down, apasa pe SPACE pentru a reveni la camera third person si jocul continua.
Alte specificatii
- Dupa lovitura, camera se schimba din third person pe bila alba pe una top-down,
pentru a putea fi vizualizata lovitura:

- Pentru punctaj complet, jocul trebuie sa fie consecvent.
- Animatia tacului pentru lovirea bilei albe se va face in vertex shader.
Punctaj
- 10% - Afisare la stdout statistici joc (cate bile a bagat fiecare, cate fault-uri s-au comis etc)
- 10% - Implementarea coliziunilor (bila-bila, bila-manta) (link-ul acesta ar fi de folos)
- 10% - Dispartia unei bile bagata in buzunar
- 15% - Animatie tac in vertex shader in momentul loviturii
- 15% - Camera third person pe directia tacului, target-ul fiind bila alba
- 15% - Vedere top-down dupa ce tacul a lovit bila ptr a se putea vizualiza lovitura
- 25% - Desenarea mesei cu buzunare si a bilelor, ca in poze
Bonus
Orice aduce realism jocului:
- Masa realista
- Linii pentru ghidare
- etc
Intrebari si raspunsuri
Pentru intrebari vom folosi forumurile de pe moodle.
Notare
Baremul este orientativ. Fiecare asistent are o anumita libertate in evaluarea temelor (de exemplu, sa dea punctaj partial pentru implementarea incompleta a unei functionalitati sau sa scada pentru hard coding). Acelasi lucru este valabil atat pentru functionalitatile obligatorii, cat si pentru bonusuri.
Tema trebuie incarcata pe moodle. Pentru a fi punctata, tema trebuie prezentata la laborator. Vor exista laboratoare speciale de prezentare a temelor (care vor fi anuntate).
Indicatii suplimentare
Tema va fi implementata in OpenGL si C++. Este indicat sa folositi framework-ul si Visual Studio.
Pentru implementarea temei, in folderul Source/Laboratoare/ puteti crea un nou folder, de exemplu Tema2, cu fisierele Tema2.cpp si Tema2.h (pentru implementare POO, este indicat sa aveti si alte fisiere). Pentru a vedea fisierele nou create in Visual Studio in Solution Explorer, apasati click dreapta pe filtrul Laboratoare si selectati Add→New Filter. Dupa ce creati un nou filtru, de exemplu Tema2, dati click dreapta si selectati Add→Existing Item. Astfel adaugati toate fisierele din folderul nou creat. In fisierul LabList.h trebuie adaugata si calea catre header-ul temei. De exemplu: #include <Laboratoare/Tema2/Tema2.h>
Arhivarea proiectului
- in mod normal arhiva trebuie sa contina toate resursele necesare compilarii si rularii
- inainte de a face arhiva asigurati-va ca ati dat clean la proiect
- click dreapta pe proiect in Solution Explorer → Clean Solution, sau
- stergeti folderul /Visual Studio/obj
- stergeti fisierul /Visual Studio/Framework_EGC.sdf (in caz ca exista)
- stergeti fisierul /Visual Studio/Framework_EGC.VC.db (in caz ca exista)
- stergeti folderul /x64 sau /x86 (in caz ca exista)
- executabilul final este generat in folderul /x86 sau /x64 la finalul link-editarii in functie de arhitectura aleasa la compilare (32/64 biti)
- in cazul in care arhiva tot depaseste limita de 20MB (nu ar trebui), puteti sa stergeti si folderul /libs sau /Resources intrucat se pot adauga la testare. Nu este recomandat sa faceti acest lucru intrucat ingreuneaza mult testarea in cazul in care versiunea curenta a librariilor/resurselor difera de versiunea utilizata la momentul scrierii temei.
8 Ball Pool Game with OpenGL & C++
Abstract
In this project, I built an interacting billiard game using modern OpenGL API. This game simulates a table with 6 pockets and 16 balls including a cue ball. The cue ball can be hit with a force using the mouse motions such that it gets an initial velocity. And the balls can roll on the table by simulating friction. I also implemented the necessary physics to modeling the collision between a ball and a sidewall, and between two balls. In addition, per-fragment shading is also implemented to achieve better lighting effect.
This report contains five part:
- Geometry and rendering setup
- Interaction of hitting a ball
- Motion of a ball
- Collision handling
- Summary and discussion
Part 1 Geometry and rendering setup
First, we create a sphere mesh for drawing the balls and also a table mesh. And then we bind 16 textures to all the balls. Figure 1 shows the mesh and textures for pool balls.
Figure 1 The sphere mesh and pool balls textures
Figure 2 The initial setup of our pool game with the table, balls, pocket and lighting
Figure 3 The shining spots on ball surfaces show per-fragment shading
Part 2 Interaction of hitting a ball
In this part, we implement an interface for hitting a ball. We can press down the left button of the mouse, mouse the cursor to a ball surface and release the mouse. The end position on the ball is the hitting point, and the vector from which the mouse moved towards the hitting point gives the force on the ball at the hitting point.
The implementation includes:
- Auto detect the ID of the hitted ball
- Calculate the force
- Assign an initial velocity to the hitted ball
For detecting the ball ID, we use color picking method by creating another render routine. For calculating hitting force we use windows coordinates to decide the size and direction of the force. And we use the following equations to derive the initial velocity for the hitted ball.
Here, the Δt is the amount of time the cue is in contact with the ball. The k is a constant coefficient. The m is the mass of the cue ball and the vector x is the difference between the starting and end points of the mouse hitting motion. The vector r represents the radius from the center that the cue ball was stuck.
Figure 4 Let’s start our game!
Part 3 Motion of a ball
Once the ball has an initial linear and angular velocities, it begins to move across the table. After it leaves the tip of the cue, the only force acting on the cue ball is the force of friction from the table. The motions of our balls include sliding and rolling. We use the following equations to update the linear and angular velocities of the ball when it moves across the table.
Here we have a new vector vp, which is the perimeter velocity of the ball at the point of contact with table. The us is the coefficient of sliding friction and g is the force of gravity.
Figure 5 The game is going on!
Part 4 Collision handling
The collision between two balls or between a ball and a wall can be detected by calculating the distance between the centers of two ball or between the center of a ball and the wall.
1. Collision between two balls
If a collision is detected, we need to update the velocity vectors of the ball involved. And we use conservation of energy and conservation of momentum principles to derive the updated velocities. The following equations show the final results.
For linear velocity:
First we calculate the normal to the collision plane. The vectors vn1 and vt1 are the normal and tangential components of the velocity of ball 1. And the vn2 and vt2 are for ball 2. The results show that the new linear velocities of two balls simply come from exchanging the normal components of two old velocities.
For angular velocity:
The ub is the coefficient of friction between two balls. The vector vpR is the relative perimeter velocity between two balls. The above equation shows the change for ball 2, and ball 1 has exact same change.
2. Collision between a ball and a wall
It is much easy to implement the collision between a ball and a wall. Similar to the reflection principle of light, we use the following equations for updating the velocity.
v’ = vt - vn
w’ = wn - wt
First we calculate the normal of the wall. The vector vn and vt are the normal and tangential component of incident velocity of the ball, and v’ is the reflection velocity. Similarly we apply wn and wt to angular velocity.
Part 5 Summary
In addition to the above implementations, the balls can also go into the pockets. If the ball is cue ball, it will automatically come out again immediately at the center of table. And the future work can be simulating the players and a chalk, which are easy to implement.
3D-Billiards-Game-OpenGL
This is the Computer Graphics course project.
Instructions |
No comments:
Post a Comment